Epson DS-40 scanner: Difference between revisions
No edit summary |
No edit summary |
||
| Line 17: | Line 17: | ||
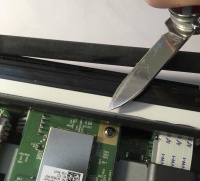
*For stubborn crud, you can use a razor blade or other sharp steel, which will not scratch the glass unless there is a harder-than-glass dirt like sand present. | *For stubborn crud, you can use a razor blade or other sharp steel, which will not scratch the glass unless there is a harder-than-glass dirt like sand present. | ||
[[File:Epson-DS-40-Scanner-repair-04.jpg|200px|thumb|scraping crud from glass platen.]] | [[File:Epson-DS-40-Scanner-repair-04.jpg|200px|thumb|scraping crud from glass platen.]] | ||
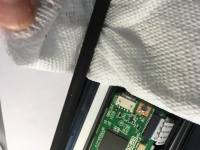
*You might also clean the roller as well as possible, for smoother operation. | *You might also clean the roller as well as possible, for smoother operation. Do not use alcohol. | ||
[[File:Epson-DS-40-Scanner-repair-05.JPG|200px|thumb|Clean roller with a cloth/paper towel with window-cleaner or distilled water]] | |||
*After the platen is clean and dry, replace the roller in its hub. | *After the platen is clean and dry, replace the roller in its hub. | ||
*Re-attach the two halves, starting in the corner without the screw. | *Re-attach the two halves, starting in the corner without the screw. | ||
Latest revision as of 14:50, 1 March 2017
The Epson Workforce DS-40 Wireless Color Document Scanner is a portable device useful for scanning receipts. It runs on four AA batteries or an optional 5V power supply, is compatible with rechargeable NiMH batteries, and can scan to WiFi devices like smartphones.
Network
The DS-40 can create its own WiFi network or be programmed to join one. A switch on the front determines how the scanner connects—joined WiFi, self-created WiFi (AP mode), or USB.
Cleaning the scanner glass
The scanner comes with a cleaning paper, but I have found that some dirt sticks too well to the glass to be removed by the cleaning paper. There is less than a mm clearance between the roller and the platen, so it is difficult to clean the glass in any better way without disassembling the scanner.
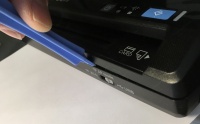
The scanner is easy to disassemble with a small phillips screwdriver and a spudger. I needed a glue, however, to replace the rubber feet.
- Remove the battery-compartment cover.
- Looking at the bottom of the scanner, with the battery compartment on the upper left, carefully remove the two rubber feet from the bottom left and the upper right, exposing the screw bays.

- Remove all three exposed screws, and store in a safe place.
- Using the spudger to loosen the grip of the claws inside the seam, carefully pry apart the top and bottom halves of the body. The last place to split is the corner where there is no screw. There are electrical wires on this side, between the two halves, so go slowly here.

- Lay the sides next to each other.
- Gently remove the roller from the hub on the side away from the gears, and move it aside only a centimeter or so.
- Clean the glass with soft tissues and a bit of ammonia-based glass cleaner. Alcohol cleaners would degrade the rubber roller, so must be avoided.
- For stubborn crud, you can use a razor blade or other sharp steel, which will not scratch the glass unless there is a harder-than-glass dirt like sand present.

- You might also clean the roller as well as possible, for smoother operation. Do not use alcohol.

- After the platen is clean and dry, replace the roller in its hub.
- Re-attach the two halves, starting in the corner without the screw.
- Replace the screws.
- Use hot glue or silicone to help attach the rubber feet.
- If you calibrated the scanner while it was dirty, you must re-calibrate the scanner to remove the streaks that will appear because of the attempted corrections.