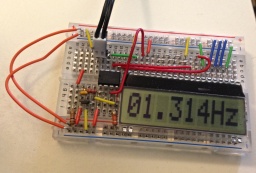
Frequency meter
Specifications

- Connect 1 Hall effect switch to watch a magnet passing once per cycle.
- Hall effect switch may be unipolar or omni-polar, but not bipolar. If unipolar, take care to place magnet correctly.
- Switching time needs to be shorter than inverse of desired highest frequency.
- Include a display with at least 4 characters.
- Include a power switch to save the battery, and/or a reset switch.
- Use a breadboard so it can be built by students, or modified.
- Allow timing of periods up to at least 10s, accurate to 0.01s.
One difficult thing about frequency meters is that they operate by counting pulses over a given amount of time, which is only good for steady frequencies, or they count time between two pulses, which gives a period which must be a divisor in a calculation done by the micro-controller often with limited maths abilities. The fact that it is a divisor means that the precision will be inversely proportional to the frequency, in the absence of floating-point maths. The frequency will have a low limit due to the instruction-time of the micro-controller, and an upper-limit due to this divisor effect. It might be possible to add a switch to notify the micro-controller of the expected range.
Circuit

For a detailed diagram, see File:Frequency meter-PICAXE-08M2.pdf.
Components
See #Datasheets for specific tips.
- Breadboard (~$5)
- Hall effect switch, unipolar or omni-polar, with quick output rise and fall times.
- Micro-controller. I use a PICAXE 08M2. ($3)
- Resonator circuit if necessary. Not available for PICAXE 08M2. (~$1)
- Floating point math unit (~$10) optional
- Display
- LCD Display, serial capable. I use Electronic Assembly's DOGM081 with SPI. ($10)
- Alternatively, a TTL-to-USB or TTL-to-serial circuit for sharing data with computer ($18)
- Hook-up wires ($2)
- Power supply
- 9V or a quartet of AAA with a 5V voltage regulator, capacitor(s), resistor(s), or
- 120V AC to 5V DC adapter, or
- Three alkaline AAA or AA batteries, or
- Four NiMH rechargeable batteries.
Program
For an explicit example, see Frequency meter with a PICAXE 08M2.
- Initiate the display
- Set an interrupt on the pin attached to the switch. Will interrupt the program wherever execution is and go to Interrupt.
- Loop.
- Increment time counter.
- Display frequency.
- Go back to Loop.
- Interrupt
- Convert count to Hz.
- Reset counter.
Datasheets
- Electronic Assembly ED DOGM081-A
- 8-character LCD dot matrix display, with SPI serial control. http://www.lcd-module.com/eng/pdf/doma/dog-me.pdf
- Read various forums for discussions on using SPI between the micro-controller and this display. For example, one on how CSB must be used: http://forums.parallax.com/showthread.php/134847-EA-DOGM-162-Display
- Is the display too dark? The supplied voltage is too high, try to bring it down a bit. I tame a 6V supply with a single 1N914 diode for low power circuits like this.
- Diodes Incorporated Hall effect switch
- This switch has a long rise and fall time, so it is not good for greater than 8Hz; but it uses very little power.
- http://diodes.com/datasheets/AH180.pdf
Honeywell SS451A omnipolar Hall-effect digital position sensor
- Works with supplies between 3.0 and 24V, taking 4.5mA at 5V. It switches on at about 85 Gauss and off at about 50 Gauss, in either direction.
- http://sensing.honeywell.com/index.php?ci_id=45443
- TT Electronics OH090 unipolar Hall-effect sensor
- The OH090 is their most sensitive device, and it switches on and off in less than a microsecond. It requires the magnet to be oriented correctly, since it turns on (voltage drops to zero) when its face is exposed to a field of about 90 Gauss only from the south pole.
- http://optekinc.com/datasheets/OH090-OHS3100.PDF
- PICAXE micro-controller system for education
- http://picaxe.com
See also
See more discussion and other circuits at Circuits for teaching physics.